Saturday 30 July 2011

Pulau Redang- layout selection =)

Now i would like to explain the layout selection of my group blog. By the way, this is my group blog's link  http://thebimbotics.blogspot.com/ . Please feel free to leave a comment about my blog =). It's all about Pulau Redang !


This is the main page of my group blog. Left side is the different informations  category  about the Pulau Redang. It will appear like below if you click resorts category.


Each of the colors represent one resort, you can click next page to lead you another choices of resorts, like below. 


You can always view back the previous resorts by clicking previous page! You can find 14 resorts in the Redang Island. 


 When you click one of the resort, it will appear like above. This page will contain sufficient information about resorts, such as price range, pictures of the resorts and so on.


e wallpaper ( part 4 : advanced layering )

This is the last steps for my e wallpaper assignment. I open back my previous file to start edit my e wallpaper via advanced layering technique =)


First of all, i selected all of the layers by clicking CTRL A. Once you clicked CTRL A, it will appear dotted line that surrounds the e wallpaper.


After that, i crop the TM logo , and i click CTRL X to make the TM logo disappear. Then i clicked filter, then  vanishing point and create plane tool.


 After that, i clicked CTRL V to paste the TM logo on vanish part. Then, I adjusted the image of the TM logo properly.


This is the final outcome =D

Thursday 14 July 2011

e wallpaper ( part 3 : retouching )

Hey there! now i gonna to explain the retouching process for my e wallpaper!


I wanted to remove the uneven lines in the fom building wall. First of all, i clicked visible layer eyes  of the mmu students picture. Then i choosed filter and clicked vanishing point . I used create plane tool and marquee tool to remove the uneven lines. The outcome is above.


I adjusted the color balance of the e wallpaper by clicking image , then i choosed adjustment and i used colour balance .


After that, i used adjustment again and i choosed level to adjust the brightness and darkness of the e wallpaper.


 Then i go filter and i choosed render , lens flare .


I changed the word by click blending options, this is the result that i done to my e wallpaper.

Friday 8 July 2011

Resort resort resort in a beautiful Island, Redang ! =))

Hello there ! I'm gonna post about the resorts in Redang Island for my final assignment.
By the way,  have you ever heard Redang Island ??  yes!  it is a beautiful island with sandy beaches, crystal clear blue sea, brilliant underwater world !! Besides the beauty scenery that could attract numbers of local people and even the foreigners,  you could find many cool accommodations at there!

This is the resorts you could find in Redang Island :
 a) Redang Kalong Resort

 b) Redang Reef Resort

 c) Redang Holiday Resort

 d) Redang Bay Resort

 e) Redang Mutiara

 f) Redang Beach Resort

 g) Ayu Mayang

 h) Laguna Redang Resort

 i)  Coral Redang Resort

 j)  Sari Pacifica Resort RDG

 k) Sari Pacifica Resort LTG

 l) Berjaya Redang Beach

 m) Redang Lang Resort

 n) Lang Sari Resort

 o) D'coconut Lagoon Resort


Redang Kalong Resort has its very own 5-star PADI dive center  !! The price range of the Redang Kalong Resort is from RM119 to RM689.


Redang Reef Resort is nestled between Redang's loveliest stretch of beach and rich coral bay. Redang Reef is both a haven of tranguility and stunning landscapes, and a doorway to an exhilarating adventure. The price of the Redang Reef Resort is range from RM70 to RM479.


This aesthetic wooden resort of the Redang Holiday Resort is designed and built blending into the natural landscape of the island. As such the natural environment is preserved with nature plants and trees. Guest who is nature enthusiastic may look forward to frequent visit of squirrels and birds. The price range of the Redang Holiday Resort is from RM135 to RM559.


Redang Bay Resort has Sandfly Cafe which is located on the sea view of the island overlooking " Pulau Paku Besar" and " Pulau Lima" . Local beverages and delicacies such as " Ais Kacang", " Keropok", "Rojak" as well as Western food are served. The price range of the Redang bay Resort is range from RM130 to RM568.


Redang Mutiara Beach Resort has prepare variety of activities such as bat cave adventure, bird nest watching, snorkeling, jungle tracking, finish, outdoor night safari, dart tournament, beach volleyball, beach soccer, marine park and so on. The price range of the Redang Mutiara Beach Resort is range from RM99 to RM 425.


There are number of facilities in the Redang Beach Resort, such as open air disco, open air restaurant, in-house karoke , internet corner and so on.  The price range of the Redang Beach Resort is from RM139 to RM899.


Ayu Mayang Resort has restaurant which will offers a wide selection of culinary delights,  and also has an impressive view of the sea and the soothing caress of gentle breezes. The price range of the Ayu Mayang Resort is from RM109 to RM509.

Saturday 2 July 2011

e wallpaper ( part 2 : layer basic )

This time i used the layering technique to photoshop the e wallpaper that i choosed.


First of all, open back the previous file that u saved ( the five pictures combined in A4 paper using selection tools ). After that, you need to open a new blank paper, which is international paper from the present and A4 size paper .


I used magic wand tool to get rid the white area.


 Next, drag the sun ray picture to the right A4 size paper. Adjust the size of the sun ray picture that you wanted. Drag the FOM building layer to the above of the sun ray layer.


After that,  i clicked duplicate layer and clicked ok button and it will appear " FOM building copy " layer.


Right clicked the "FOM building copy" layer and clicked blending options . I changed from normal to overlay via blend mode. Thus, the colour of the FOM building will change!


I dragged mmu logo and mmu mascot to the right side A4 paper and i re-sized the mmu logo and mmu mascot.


i used dodge tool to make the MMU building brighter.


I dragged the MMU students picture to the right side paper. I apply blending options towards the MMU students picture. I edited drop shadow, outer glow, inner glow, colour overlay, gradient overlay and stroke. Besides that, i changed the opacity from  100% to 75% .


I draw-ed a rectangle using rectangle tool. After that, i clicked horizontal type tool to write  FOM OPEN DAY 15 AUGUST 2011.


i used Arial as a font and changed the size. I right clicked the shape 1 and choose blending options.  I edited the drop shadow and opacity from 100% to 87% .Then, I choose two layers to  merged  by pressing CTRL E. Then i used eraser tool  to get rid of the edge of the building.


This is the final outcome.

Sunday 26 June 2011

e wallpaper ( part 1 : selection )

I would like to share my experience in doing the e-Wallpaper of FOM ( Faculty of Management ) open day.


First of all, i created a new file by pressing CTRL+N . After that, choose International Paper from the Present.


Then, I would choose A4 size.


After that, I would started the selection with the first picture, which is MMU students. I drag the picture into the photoshop.


If you need to make your pictures bigger or better view to pinpoint a flaw, you can enlarge the whole photo or different areas of the photo by using the zoom tool .

How to use zoom tool?? 

First, select the zoom tool ( the magnifying glass) . The magnifying glass with the plus sign enlarges the picture. You can change the sign of the magnifying glass to plus size by pressing " ALT ". Press ALT continuously and click the MMU students picture, zoom in effect will appear.


The magnifying class with the minus sign reduces it. Change the sign of the magnifying glass to minus size by pressing " ALT " . Press ALT continously and click the MMU students picture, zoom out effect will appear.
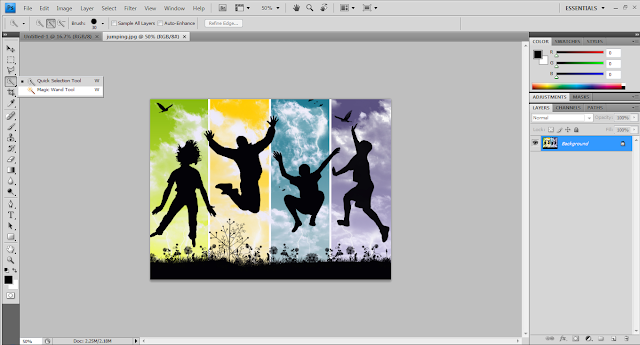


Next, i cropped out the MMU students from the background, right click on the forth tool on the left navigation toolbar, I selected  quick selection tool.


After that, i clicked on the pictures which i want to crop out. Crop out the angle of the the MMU students cautions and patiently. It will appear a dotted line once you clicked the MMU students by using the quick selection tools. 


Cautions : You should select the angle of the MMU students accurately, it will affect the result that u wanted if you select the angle of the MMU students which are out of the shape.


You can always press CTRL Z to undo the MMU students picture.


After that, i use the Move Tool to drag the MMU students  which already cropped out  to the A4 size paper.


Clicked the move tool, it will appear 8 small squares beside the mmu students picture. Pressed Shift + left mouse to re-size the MMU students. Then press Enter when you selected the suitable size.


Next, I repeated the same step above to crop out the rest of the pictures and dragged to the A4 size paper.


After that, i dragged the final picture, which is FOM building to the photoshop.


This time i used Polygonal Lasso Tool and right click choose Lasso Tool  to remove the ceiling of the FOM building.Using the lasso tool, simply click and drag a freehand selection with the mouse.


This is the 5 pictures combined in 1 A4 size paper after i used selected tools.


5 ewallpaper that i choosed =D

Lecturer had asked us to choose 5 best ewallpaper for the assignment, i search for quite long and i think these 5 pictures is the most suitable for the assignment. I hope these 5 pictures will work well for my assignment though =D  The theme of the assignment is MMU Open Day 2011.

 This is FOM buillding


    This is MMU students which jump with joy


                                                This is  MMU mascot


This is MMU banner


   This is the sunlight picture which will use to decorate my background